

Chào mọi người,

Bài viết này mình sẽ hướng dẫn mọi người về thủ thuật ẩn liên kết tải xuống cho
Blogger để không cho người dùng biết được nội dung mà bạn đang tải xuống hoặc phòng tránh rủi ro.Bài viết được mình tham khảo từ
thietkeblogspot và được chỉnh sữa tối ưu từ GiaHuy.Net.Chúng ta bắt đầu với thủ thuật này nhé.
Bước 1. Mọi người truy cập vào trang tổng quan blogger.Bước 2. Trên bảng điều khiển Blogger, nhấp vào
chủ đề.Bước 3. Nhấp vào biểu tượng mũi tên xuống, bên cạnh nút
tùy chỉnh.Bước 4. Bây giờ các bạn tìm đoạn mã
]]></b:skin> và thêm đoạn mã CSS bên dưới vào sau thẻ đó.
/* Get download by Giahuy.net */
.ghBox{display:flex;align-items:center;max-width:500px;margin-block:1.6em;border:1px solid var(--border);padding:0.8rem 0.8rem;border-radius:7px}
.ghBox:hover{box-shadow:0 15px 50px -20px rgb(0 0 0 / 20%)}
.ghBox .fT{display:flex;align-items:center;justify-content:center;flex-shrink:0;width:42px;height:42px;background-color:rgb(152 155 159 / 20%);border-radius:7px}
.ghBox .fT::before{content:attr(data-text);opacity:.8}
.ghBox .fT.lazy{background-size:cover;background-position:center;background-repeat:no-repeat}
.ghBox .fT.lazy::before{display:none}
.ghBox .button{flex-shrink:0;height:40px;margin:0;padding:10px 12px;font-size:small}
.ghBox .button::after{content:attr(aria-label)}
.ghBox .fN{flex-grow:1;width:calc(100% - 200px);padding:0 15px}
.ghBox .fN >*{display:block;white-space:nowrap;overflow:hidden;text-overflow:ellipsis}
.ghBox .fS{line-height:1.5;font-size:small;opacity:.8}
.button{display:inline-flex;align-items:center;column-gap:8px;border:0;border-radius:7px;background-color:var(--primary);font:1rem / 1.5 var(--fontBody);white-space:nowrap;overflow:hidden;text-overflow:ellipsis}
.ghBox .button{color:white!important}
.ghBox .button svg{stroke:white!important}
.ghBox .button svg path{stroke:white!important}
Bước 5. Mọi người thêm đoạn mã
Javascript bên dưới vào trên thẻ </body> hoặc </body>.
<script>
//<![CDATA[ /* Get download by GiaHuy.Net */
document.addEventListener("DOMContentLoaded", function () {

  var downloadButtons = document.querySelectorAll('.download');
  downloadButtons.forEach(function(button) {
    button.addEventListener('click', function (event) {
      event.preventDefault();
      history.replaceState(null, null, '#download');

      var id_sp = this.getAttribute('name');
      localStorage.setItem('gh_id', id_sp);

      var script = document.createElement('script');
      script.src = '/feeds/posts/summary/' + id_sp + '?alt=json-in-script&callback=processEntry';
      document.body.appendChild(script);

      setTimeout(function () {
        window.open('/p/download.html', '_blank');
      }, 1000);
    });
  });

  if (window.location.hash === "#download") {
    setTimeout(function () {
      var downloadSection = document.getElementById('download');
      if (downloadSection) {
        downloadSection.scrollIntoView({ behavior: "smooth", block: "center" });
      }
    }, 300);
  }
});

function processEntry(k) {
  if (k.entry) {
    var links = k.entry.link;
    for (var i = 0; i < links.length; i++) {
      if (links[i].rel === "enclosure" && links[i].type === "text/html") {
        var get_link = links[i].href;
        localStorage.setItem('gh_getlink', get_link);
        break;
      }
    }
  }
};
//]]>
</script>
Thay thể
/p/download.html bằng đường link của bạnBước 6. Các bạn lưu lại thay đổi để hoàn thành.
Bước 7. Trên bảng điều khiển Blogger, nhấp vào
trang/pages và tạo trang mới. Và chọn chế độ HTML và sao chép đoạn mã bên dưới.
<style>
.hidden{display:none!important}
p{margin:0}
p,.getlink-button,.time-wrapper{text-align:center}
.getlink-button a{border:1px solid #6dab3c;color:#6dab3c;position:relative;font-size:inherit;display:inline-block;border-radius:100px;box-shadow:none;font-weight:400;line-height:1.5em;margin:5px;outline:0;padding:.50em 1em;cursor:pointer}
#timer-countdown{margin:25px 0 30px 0;display:inline-block;width:120px;height:120px;line-height:120px;color:var(--primary);border-radius:50%;border:2px solid var(--primary);font-size:60px;font-weight:100}
</style>

<div class='time-wrapper hidden'>
  <h4 style='text-align:center;color:#0000FF'>Quá trình tải xuống của bạn sẽ bắt đầu sau giây lát!</h4>
  <p><span id='timer-countdown'>0</span></p>
  <div class='getlink-button'></div>
</div>

<script>
//<![CDATA[
var id = localStorage.getItem('gh_id');
var get_link = localStorage.getItem('gh_getlink');
var timer = 20;

document.addEventListener("DOMContentLoaded", function () {
  if (id) {
    var timeWrapper = document.querySelector('.time-wrapper');
    var countdown = document.getElementById('timer-countdown');
    var getlinkButton = document.querySelector('.getlink-button');

    if (timeWrapper && countdown && getlinkButton) {
      timeWrapper.classList.remove('hidden');
      var downloadTimer = setInterval(function () {
        countdown.textContent = timer;
        timer -= 1;
        if (timer < 0) {
          clearInterval(downloadTimer);
          countdown.textContent = '0';
          getlinkButton.innerHTML = '<a href="' + get_link + '" target="_blank" rel="noopener nofollow" title="Tải xuống">Tải xuống</a>';
        }
      }, 1000);
    }
  }
});
//]]>
</script>
Trong đó
timer = 20 là thời gian chờ, các bạn có thể tùy chỉnh thời gian chờ theo ý tưởng của các bạnBước 8. Các bạn đặt tiêu đề cho trang và
xuất bản.Bước 9. Đến phần viết bài, các bạn đến phần
cài đặt các bạn tìm phần đường liên kết tiêu đề và đính kèm và bật lên.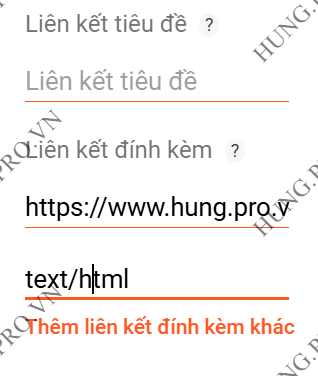
Bước 10. Thêm mã
button vào trang bài viết, nơi mà bạn muốn hiển thị.
<!-- Nút tải (chèn trong bài viết) -->
<div class='ghBox' id='download'>
  <span class='fT' data-text='zip'></span>
  <div class='fN'>
    <span>file_name.zip</span>
    <span class='fS'>200kb</span>
  </div>
  <a class='button download' href='#download' name='ID_bai_viet' aria-label='Download'>
    <svg class='line' viewBox='0 0 24 24'>
      <path d='M12 22C17.5228 22 22 17.5228 22 12C22 6.47715 17.5228 2 12 2C6.47715 2 2 6.47715 2 12C2 17.5228 6.47715 22 12 22Z'></path>
      <path d='M12 8.5V14.5'></path>
      <path d='M9 12.5L12 15.5L15 12.5'></path>
    </svg>
  </a>
</div>
| Đánh dấu | Thông tin |
|---|---|
zip |
Đuôi file |
file_name.zip |
Tên file |
200kb |
Dung lượng file |
ID_bai_viet |
Id bài viết |
DEMO THỦ THUẬT TẠI ĐÂY.
DEMO THỦ THUẬT
Chúc mọi người thành công.Theo GiaHuy.Net
Post a Comment